Introduction - What Is an Appspec.yml File?
A note before I begin: this blog post is a continuation of a previous blog post focused around automation using CodeDeploy. The section in which I explain our first basic appspec.yml file is contained here along with screenshots of whe infrastructure tools we are using with CodeDeploy on AWS and my GitHub repository.
To directly quote Amazon, with regards to an appspec.yml file usage in conjunction with an EC2/on-premises compute platform:
“It is used by CodeDeploy to determine:
What it should install onto your instances from your application revision in Amazon S3 or GitHub.
Which lifecycle event hooks to run in response to deployment lifecycle events.”
As Amazon says, the main purpose of an appspec.yml file is to decide two things in terms of deploying what it needs where: step one is deciding where to install (or dump) which files onto what instance and where. Step two is to decide what to do next, and that can be broken down into two categories generally speaking: before something happens, and after something happens. Let’s take a look at the appspec.yml file I am using currently for my web application.
Appspec.yml File Webhooks and You
Let’s say you need to run bash scripts on your server only after CodeDeploy has successfully worked its magic, but you don’t want to run them every time you create an instance manually. That’s where appspec.yml hooks come into play. There are two hooks you need to know of: BeforeInstall and AfterInstall. BeforeInstall executes your chosen scripts before CodeDeploy dumps your repository data into your EC2 Instance(s), and (You guessed it!) AfterInstall executes your chosen scripts only after CodeDeploy has placed your repository files into your instance(s).
This is extremely useful. It is worth noting that I am currently using a Terraform user_data script at instance creation to install some basic important modules (like the CodeDeploy agent itself) at runtime, but let’s say you want certain scripts to be run only after CodeDeploy has pulled your repository files into your instances. Then it makes a lot of sense to make use of the Appspec.yml file’s AfterInstall functionality for scripting. The AfterInstall parameter will enable our scripts to be context-sensitive.
On this particular example EC2 instance, I am pulling one of my senior design group’s project’s reactJS applications into an EC2 instance. I want the EC2 Instance to be able to install necessary reactJS scripts that are not included with a default installation of nodeJS/npm. This means (you probably guessed this already) I need to use the AfterInstallation parameter in the appspec.yml file to run a script to install the ReactJS scripts I need only after my ReactJS app has been transported to the instance. Let’s take a look at what that looks like in the appspec.yml file.
Breaking Down the Appspec.yml File
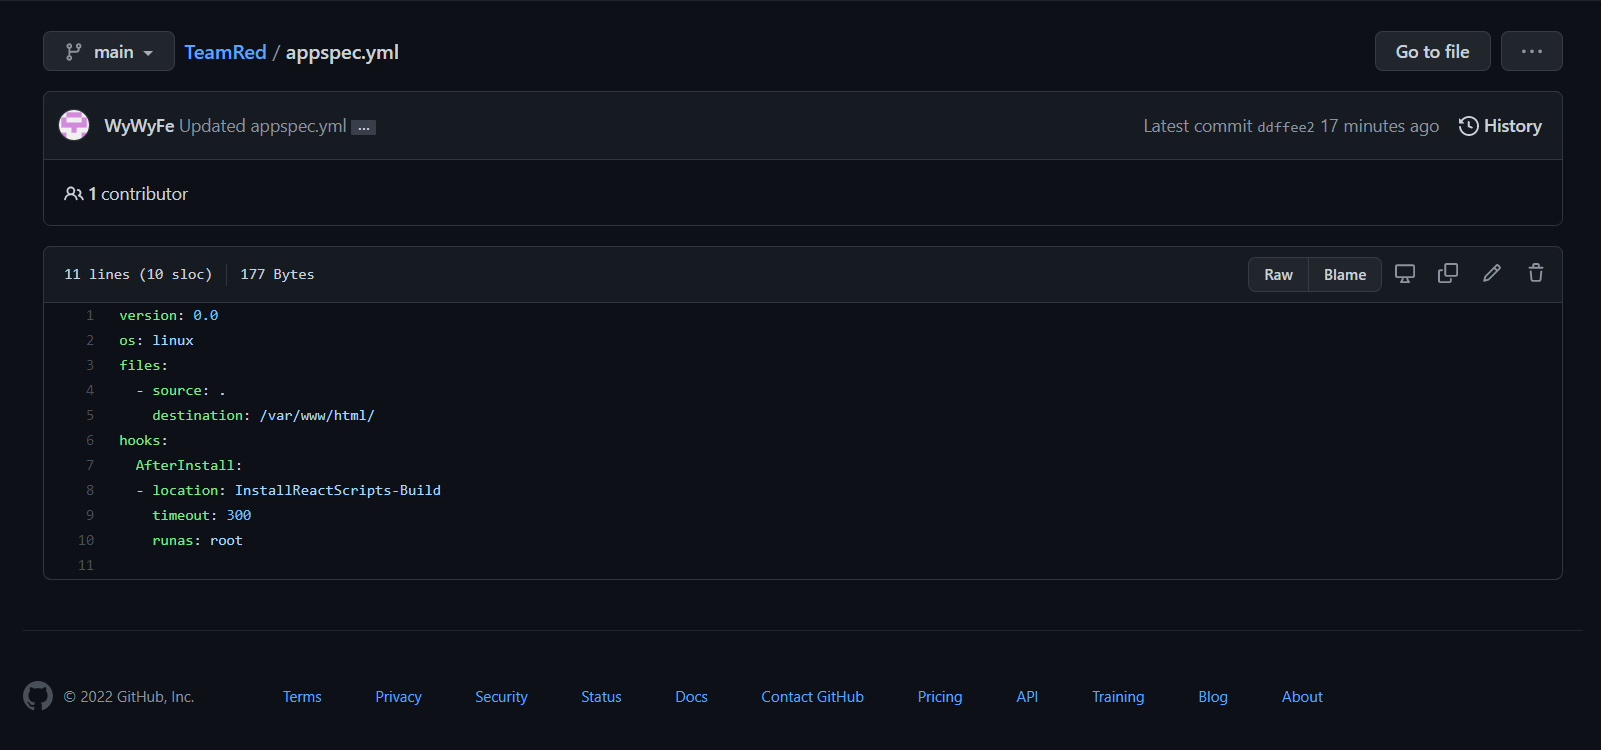
The first picture is our appspec.yml file, which as I said before, specifies what gets installed, when it gets installed, and where it gets installed. From top to bottom, let’s describe a few things.
For starters, the version will always be 0.0, the target instance is a Linux instance, and our files we are importing using CodeDeploy onto our instance are all located at the top of the directory of my GitHub repository, so I specify that the source is “.” because the period symbolizes the current directory in Linux, meaning all files will be put onto the EC2 Instance once CodePipeline pulls from the repository into our destination, which is set to /var/www/html/, the default apache html folder.
So to recap so far, all our files will be dragged from our GitHub repository onto our EC2 Instance’s apache root directory. From here, we enter our hooks, where things get interesting. AfterInstall: actually specifies that ONLY once the files: section has completed will the script at the top of the repository directory be run (InstallReactScripts-Build). Note that I name the bash script directly without any pathing - this is because the file exists at the top of our repository’s directory, so there is no need to specify ./InstallReactScripts-Build, for exampe. The standard timeout for this task is set to 300, and for now, we will always run these scripts as root so that we do not run into permission errors when using bash scripts.
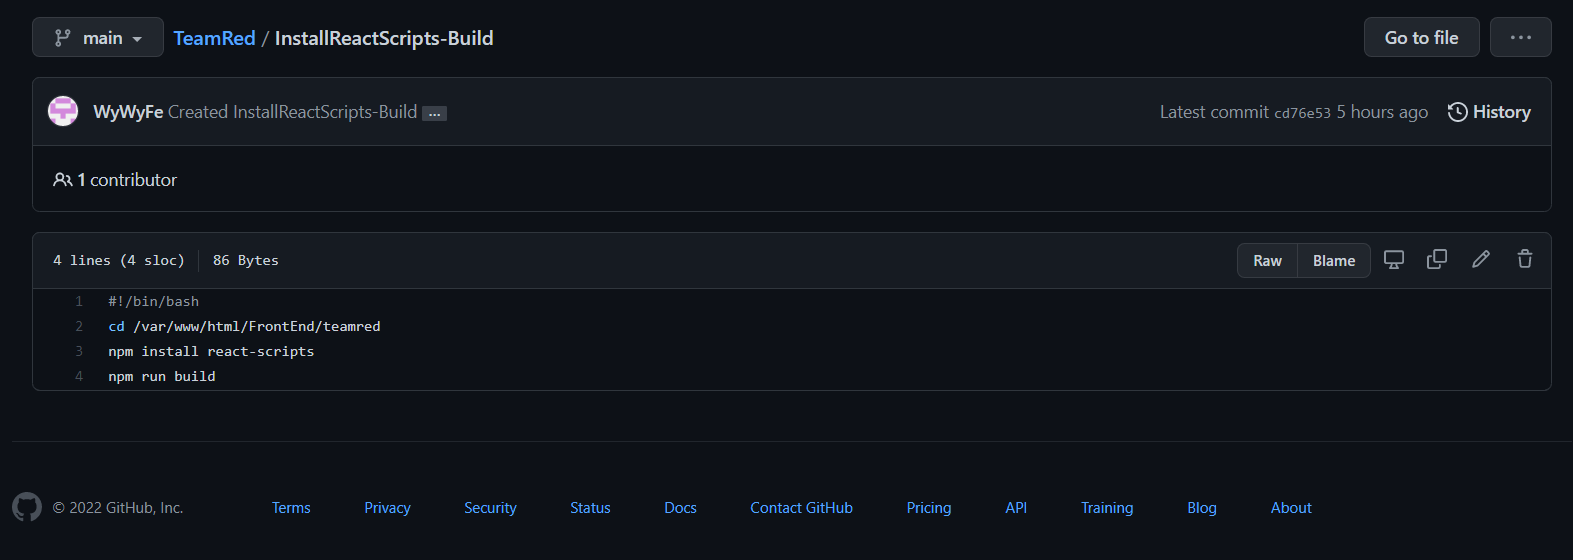
Breaking Down the Bash Script File
Our second picture above illustrates a simple, yet effective, bash script. As explained above, after the appspec.yml configuration steps are complete, AfterInstall kicks in, where our bash script is executed. First, according to the script itself, we change directories directly into our instance’s version of our ReactJS project, installs scripts necessary to interact with our React application on our fresh EC2 Instance version of NPM, and then executes an npm run build, which creates a build (essentially a production-level folder with all assets neatly bundled and easily servable) version of our ReactJS application. Not all at once, mind you - the bash command line is smart enough to wait for each step to finish execution before moving onto the next step, so all of these steps don’t step on each other’s toes, so to speak.
Conclusion
Wrapping things up, let’s reiterate what our appspec.yml file can do for us. Using AWS CodeDeploy and CodePipeline, any instance we specify to be hit by these changes can, and will, be deployed to in a matter of minutes (sometimes seconds), be configured after the necessary app files are moved from a repository of your choice onto your EC2 Instances, be configured using basic bash shell scripts, and served at a moment’s notice. No more are the days of having to manually configure each and every server you have painstakingly from start to finish - let your user scripts and bash scripts work in conjunction with CodePipeline to automatically install and configure necessary files before you even SSH into your server! The future is now folks.
Happy deploy…ing?~