Introduction - Forwarding Ports: Risks and Benefits
Ever wonder what it’s like to leave a door open to your house and leave signs across the world indicating your address and that you left your door open? No? Well, that is kind of like what forwarding a port is like, except a liiiiiittle bit more safe, becasue it is on a machine-by-machine basis. Essentially, some services (online games, servers for games, etc) require that whatever network you are connecting from / want people to be connecting to have certain ports to certain devices hosting/being hosted open.
The main benefit of opening your ports on your specific machine is that it allows you to ensure that whatever internet protocols that may have been giving you issues are allowed to operate as necessary ONLY on one specific device that YOU, the user, specifies. In your daily life this may not be the most useful thing to know, however, it is something that all IT and IT-adjacent people should know about, in my opinion.
There are a few things the user should be aware of though.
1) The process of port forwarding I am about to describe may make your machine, and perhaps your network if a hacker gained access to your machine, vulnerable to hackers on the internet. However, generally speaking, unless you post your machine’s IPV4 address on the internet and begged to be hacked, it is pretty uncommon to hear of people getting hacked because they have a port forwarded. It is much easier for hackers to gain access to personal information through phishing emails, but that is a story for another day.
2) To mitigate the above vulnerability aspect, simply de-activate the port you forwarded when it is not in use. For example, if you no longer play on your Minecraft server and it is not running, simply disable your router’s forwarded port rule and be freed from the stress!
Gathering Necessary Information
I will be using a Linux virtual machine to create a Minecraft server that is visible to the internet. This ensures that I am not compromising my main machine, and that I can still showcase addresses and all the relevant steps for you guys.
For starters, run the ifconfig command on your command console and you will be greeted with a list of IP addresses. Find your IPV4 IP address as shown in the image below, highlighted in white. Copy this down someplace, we will use it very soon. 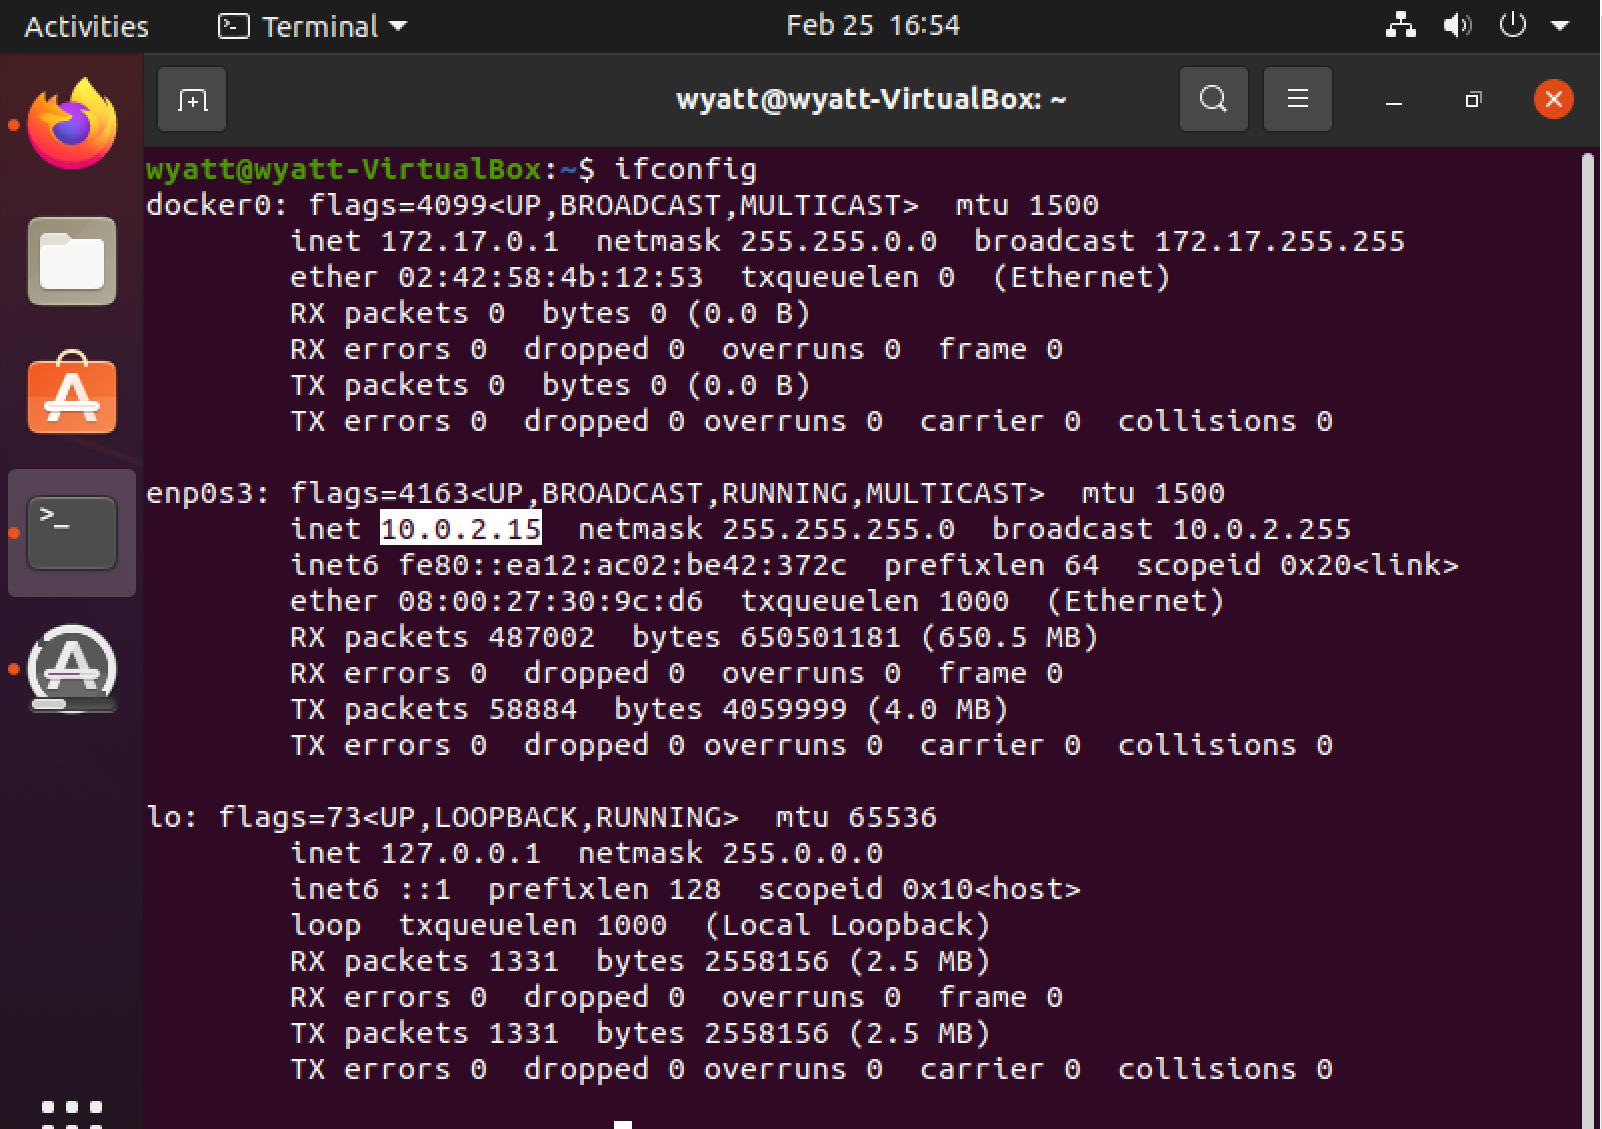
Accessing and Configuring Your Router
Next, go to your internet browser and type 192.168.0.1 which is the default address for most home network’s router interface. Keep in mind that this is YOUR network interface configured by whatever router you are connected to, NOT a publicly accessible router from somewhere else in the world. You should see something like this: 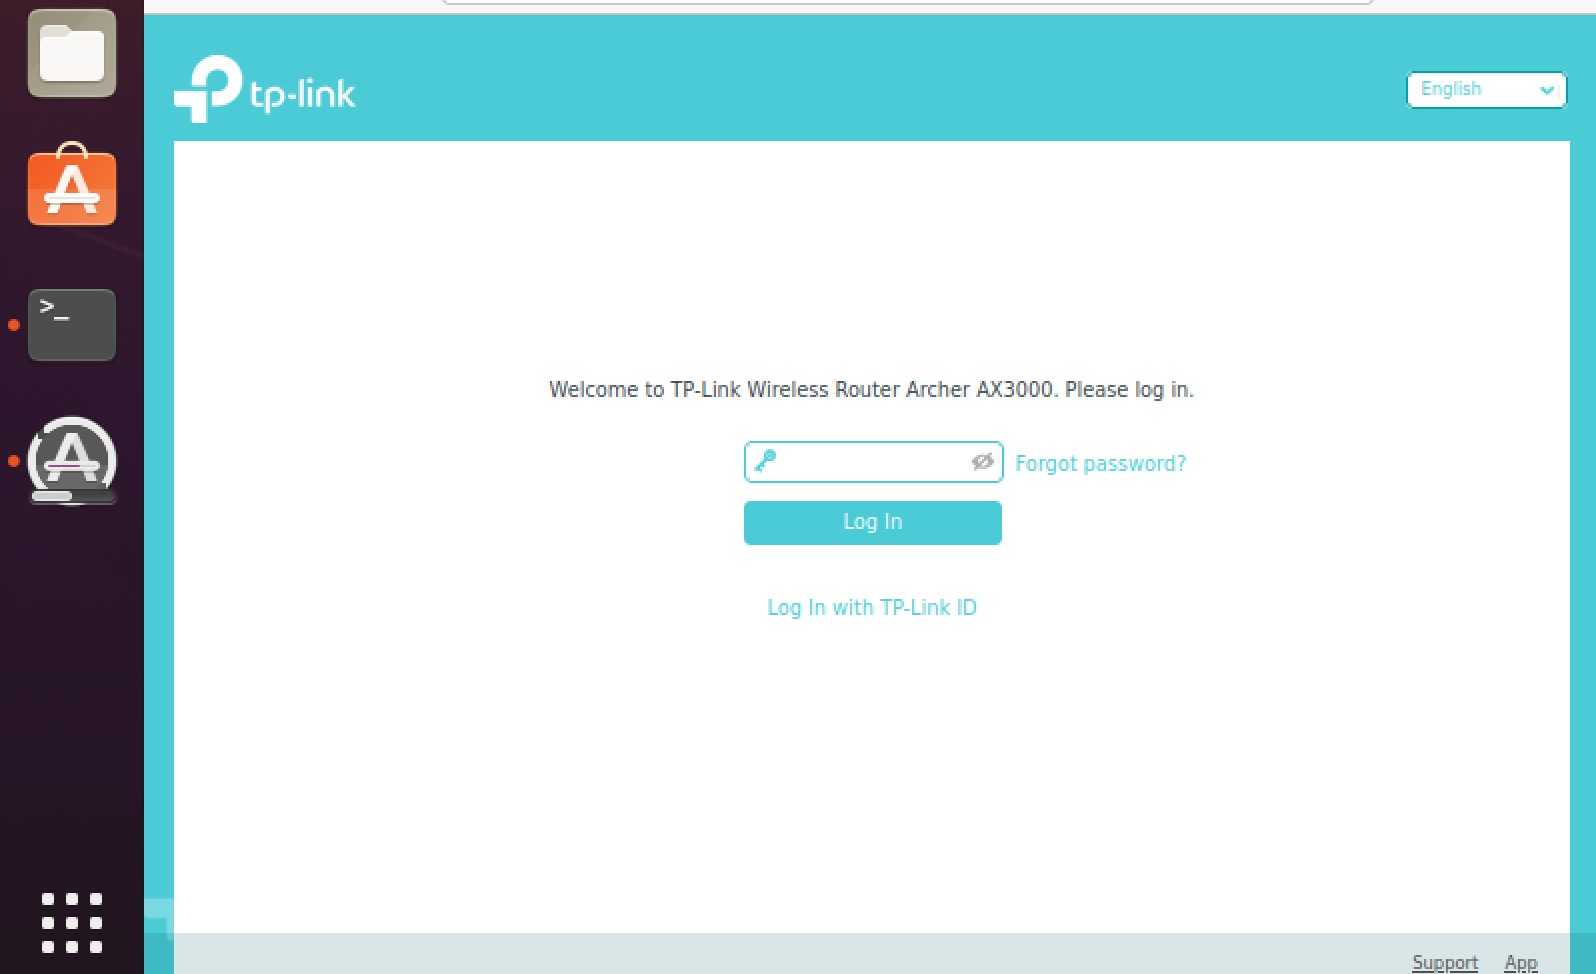
The username and password will depend on your brand of router. If you are unsure of your router type, simply look at what model router you have, note the manufacturer (in my example case, it is TP-Link), and google results for “TP-Link AX3000 router default username and password.” Usually these default values are documented online. Be sure to change your username and password to custom values after your first login, however!
Next, we will go to the Advanced tab (in most routers, port forwarding is located under some tab labeled Advanced) and find anything labeled “Port Forwarding,” or perhaps NAT Forwarding like in my example shown below. 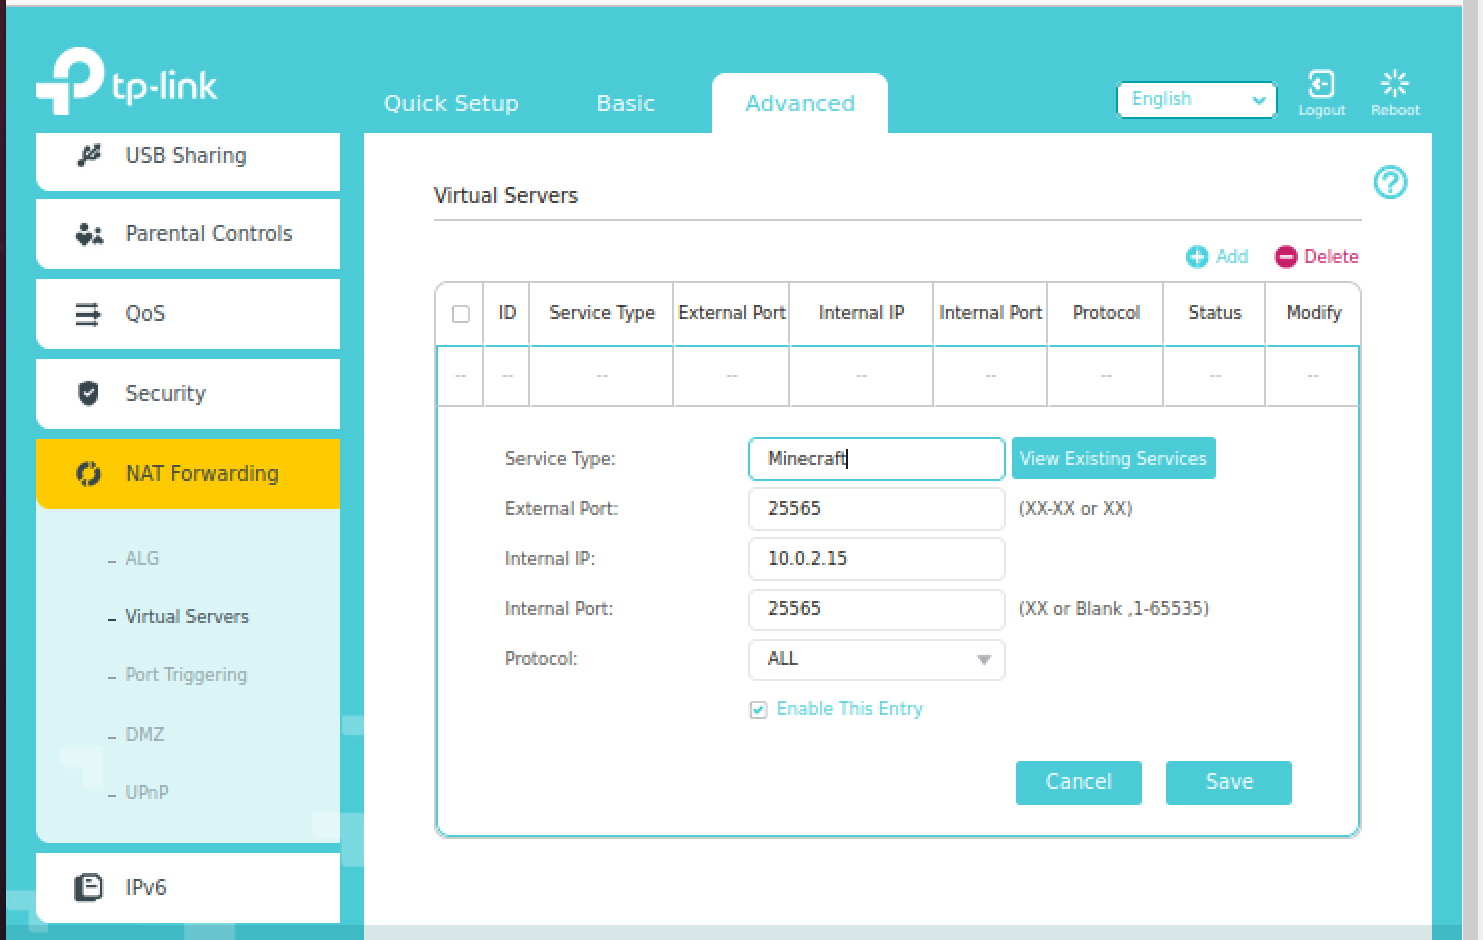
You will probably have already noticed that there are values filled out in the box. I will explain those momentarily. For now, just know that to get to this point, I went through Advanced > NAT Forwarding > Virtual Servers, and clicked the teal Add button. This process opens up the forwarding interface. There are three values you need to know: 1: the port you wish to open to allow traffic through, 2: the internal IPV4 address of the machine you wish to host the server on, and 3: the protocol you wish to enable this service to run on, being either TCP or UDP.
For this example it is fine if I run this on “All,” meaning that the ports will be reachable using both TCP and UDP. For security reasons, it is possible that you may want to use only one or the other instead of both, but for simplicity’s sake, let’s continue using both.
The internal IP address is the highlighted picture I showcased earlier. Minecraft’s default hosted port is 25565, and is what most people use to connect to public servers, so enter the external port and internal ports “25565” and hit Save. Next, run your server using the executable, and once your server is up and running, navigate to https://canyouseeme.org, which will automatically fill out your public IP address for you (anyone attempting to connect to your server must connect using this public IP address) and if you forwarded the same port as I did for Minecraft, (and your server is also already up and running), hit the Check Port button to ensure that you did everything correctly.
For safety issues, I don’t want to display my public IP address on here, so I will cut down the photo to only show what the success message looks like if you configured everything correctly. 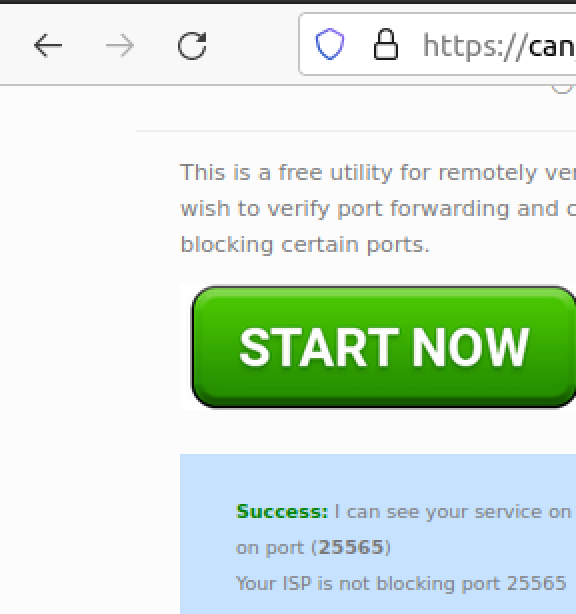
You’re Done!
Congratulations! You have successfully opened traffic on one machine to the rest of the internet. Sometimes, if your ISP has a Strict NAT type, it can be neccessary to forward ports for certain applications like video games and the like to function properly. For example, Call of Duty has very specific ports it uses to allow users to connect to each other, so if your ISP’s NAT Type is set to Strict, unless you change that manually (which is a whole other tutorial), you will need to allow access to your machine through Call of Duty’s specified ports. Happy forwarding!